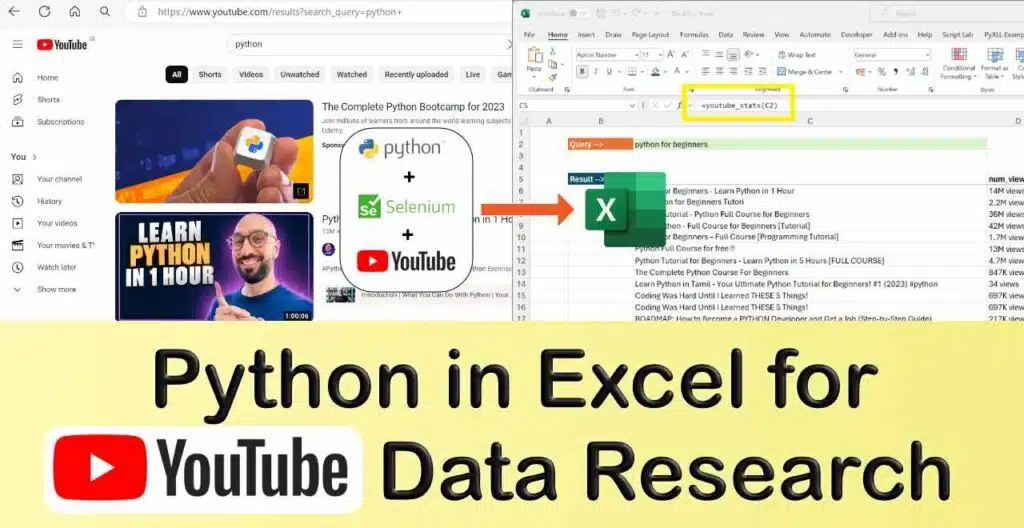
Unlock the full potential of your YouTube video research by seamlessly integrating Python in Excel. As a content creator, staying ahead requires insightful data on video performance and trending topics. While YouTube offers valuable data, the real game-changer is having that information readily available in Excel!
Traditional web scraping tools like PowerQuery fall short when it comes to extracting dynamic data requiring JavaScript execution. Python, on the other hand, excels in complex web scraping tasks, allowing us to navigate through sites like YouTube with ease, even in the presence of client-side JavaScript rendering.
In this article, we will delve into the art of web scraping YouTube data using Python. Moreover, we’ll demonstrate how to effortlessly bridge the gap between Python and Excel, enabling interactive querying of scraped data directly within Excel.
Our weapon of choice for this seamless integration is PyXLL, the Python Excel add-in. Unlike other tools, PyXLL stands out by allowing Python code to connect to internet resources without any sandboxing limitations. Running your Python code locally on your PC within Excel, PyXLL ensures your code and data remain secure, never leaving your machine. Plus, you can easily distribute your Python-powered Excel tools to colleagues, extending the benefits to non-Python users.
Empower your YouTube research with the perfect synergy of Python’s robust web scraping capabilities and Excel’s intuitive data analysis environment. Let’s transform your data-driven insights and elevate your content creation strategy!
Table of Contents
Step 1 – Getting the data in Python
For most web scraping tasks in Python I would reach for the BeautifulSoup package. BeautifulSoup is a really great web scraping Python package that greatly simplifies extracting data from HTML documents. However, like a lot of sites, YouTube makes extensive use of JavaScript and so the content we need isn’t available in the plain HTML files, it needs the pages to actually be rendered by a web browser.
All is not lost though! We can use Selenium to render the pages for us, including the JavaScript, and fetch the data we need. Selenium operates as a web driver, functioning similarly to a standard web browser. However, instead of relying on human input for control, it operates through automation scripted tasks. Commonly employed in web testing, Selenium also proves valuable for web scraping, as demonstrated in this task.
Installing the Selenium Python Package
To install the Selenium Python package simply run
pip install selenium
That will download and install the Selenium Python package into your Python environment. If you are using a Python virtual environment or conda environment, make sure you activate that before running the above command.
Installing the Selenium Web Driver
In order for Selenium to work it requires a Web Driver. The web driver is crucial for rendering the web page. It acts as a complete web browser implementation, excluding the user interface components. It is responsible for displaying the web page of interest accurately.
There are various different web drivers available:
| Web Driver Name | Browser | Download |
| ChromeDrive | Google Chrome | Download |
| GeckoDriver | Firefox | Download |
| WebDriver | Microsoft Edge | Download |
For the web driver to work with Selenium it needs to be installed on your System Path. To do that, follow these steps:
- Download the webdriver of your choice from the links above.
- Extract the downloaded ZIP file and copy the web driver file somewhere on your PC.
- Copy the path of the folder where you saved that web driver executable file.
- In a Windows File Explorer, find “This PC” and right-click it and select “Properties”.

- Select “Advanced system settings” and then “Environment Variables”
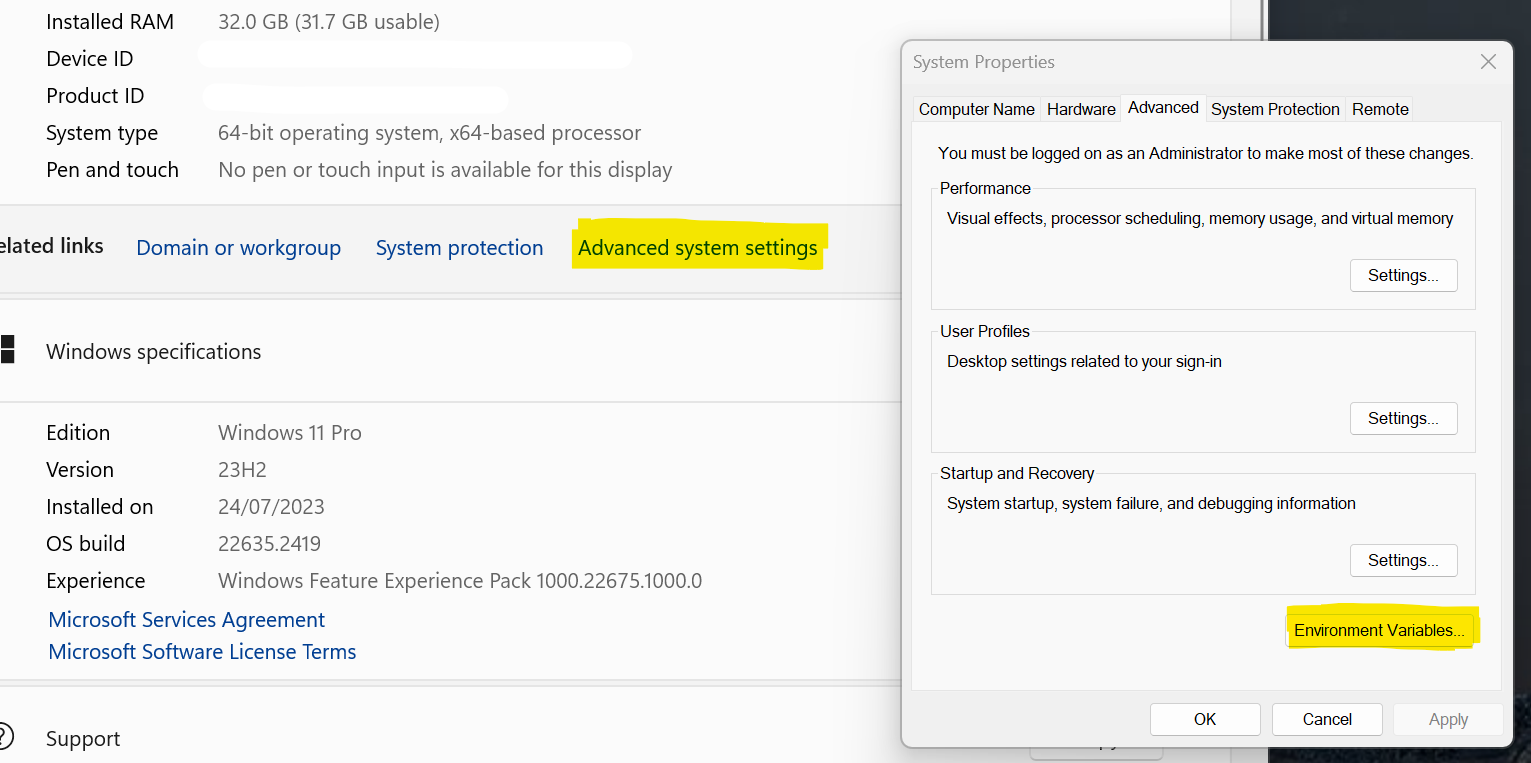
- Find “Path” under “User variables” and add the folder you copied in step 3 to the Path and click “Ok” to save the settings.
Note: You will need to re-open any command prompts and your Python IDE (e.g. VS Code) in order for the change to the Path to take effect.
Fetching a web page using Selenium
Now we’re ready to start writing some Python code!
Note: For the rest of this article we will use the Chrome web driver. If you are using a different web driver you will have to make some small changes to the code.
To work through and understand the code I will use a Jupyter notebook. This is a convenient way to be able to edit and run code in small blocks. Understanding the required code makes it simple to refactor into a Python module. This module becomes usable from anywhere, including Excel.
We first need to create a selenium WebDriver object. This is what will allow us to fetch and inspect a web page to get the information we need. Enter the following code into a Jupyter notebook and run the cell:
from selenium import webdriver
driver = webdriver.Chrome()
driver.get("https://www.youtube.com/results?search_query=python")
This will open a new browser window displaying that page. We can then use the browser inspector to identify web page elements. Later, we’ll learn how to achieve this without displaying the browser.
In this case, we want all elements with the id “video-title”. To ask selenium to find all of these “video-title” elements we use what’s called an “X-Path”. In the browser inspector you can right click on an element and select “Copy -> Copy X-Path”. Doing that, we get the following X-Path:
//*[@id="video-title"]
Now we use the WebDriver object again to get all elements matching that X-Path and append each link to a list:
elements = driver.find_elements("xpath", '//*[@id="video-title"]')
videos = []
for element in elements:
    href = element.get_attribute(‘href’)
    title = element.text
    videos.append({
       “href”: href,
       “title”: title
    })
“videos” is a Python list of dictionaries containing all of the video links and titles found on the page we’ve queried.
There’s more information we can still extract from this page. It would be interesting to know how many views each video has had, and how long ago the video was made. This might give us some ideas about what topics are popular and provide inspiration for our own next video.
To find the number of views go back to the browser inspector and select one of the elements that shows the number of views for a video. Select Copy -> Copy X Path again and you’ll see that it gives you this X-Path:
//*[@id="metadata-line"]/span[1]
We can use this to find all matching elements, as before, but we need to do something slightly different this time as we want to make sure we get the right number of views for each video.
So, instead, we look for a block further up that contains both the video title and the number of views. There’s one with the id “dismissible” which has both the title and the number of views contained within it. The X-Path for that element is
//*[@id="dismissible"]
Let’s change our code to iterate over all elements matching that X-Path. We can then locate the video title and the number of views beneath each element. To find elements below a specific element using an X-Path, add a “.” to the start of the X-Path. This causes the search to start from the current element.
# Find all elements containing a video
elements = driver.find_elements("xpath", '//*[@id="dismissible"]')

# Iterate over each element to get the details
videos = []
for element in elements:
    # Start with an empty dict
    video = {}

    # Find any title elements below this element
    titles = element.find_elements("xpath", './/*[@id="video-title"]')

    # Take the first and add it to the video dict
    if len(titles) > 0:
        title = titles[0]
        video["title"] = title.text
        video["href"] = title.get_attribute('href')

    # Find any number of views elements below this element
    num_views = element.find_elements("xpath", './/*[@id="metadata-line"]/span[1]')

    # Take the first and add it to the video dict
    if len(num_views) > 0:
        num_views = num_views[0]
        video["num_views"] = num_views.text

    videos.append(video)
With this method, you can continue extracting additional details progressively. It also allows loading each video’s page to gather more information from there if needed.
Putting it altogether in a function
In order to be able to easily re-use this code we’re restructure it into a Python function that will return these video details in a pandas DataFrame for a given query. Our function will look like this:
def youtube_stats(search_query):
    return a DataFrame of video details
We’ll then be able to call that whenever we need, even from inside Excel using the PyXLL Python Excel add-in!
We’ll start with the last part first, turning our list of dictionaries into a DataFrame. The following code will do that using the videos list from the earlier code:
import pandas as pd

df = pd.DataFrame(videos, columns=["title", "num_views", "href"])
Next, when calling this as a function we don’t really want the web browser window to be displayed each time we call the function. To prevent that we have to pass some options when constructing the WebDriver object:
options = webdriver.ChromeOptions()
options.add_argument("--headless")

driver = webdriver.Chrome(options)
Now, assembling all of these code fragments into one function gives us:
from selenium import webdriver
import pandas as pd
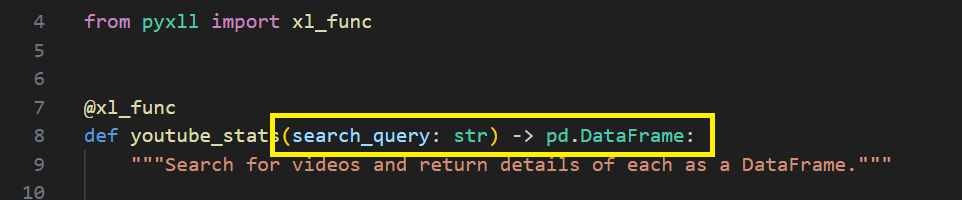
def youtube_stats(search_query):
"""Search for videos and return details of each as a DataFrame."""
# Get the headless Chrome web driver object
options = webdriver.ChromeOptions()
options.add_argument("--headless")
driver = webdriver.Chrome(options)
# Get the query result page
url = f"https://www.youtube.com/results?search_query={search_query}"
driver.get(url)
# Find all elements containing a video
elements = driver.find_elements("xpath", '//*[@id="dismissible"]')
# Iterate over each element to get the details
videos = []
for element in elements:
# Start with an empty dict
video = {}
# Find any title elements below this element
titles = element.find_elements("xpath", './/*[@id="video-title"]')
# Take the first and add it to the video dict
if len(titles) > 0:
title = titles[0]
video["title"] = title.text
video["href"] = title.get_attribute('href')
# Find any number of views elements below this element
num_views = element.find_elements("xpath", './/*[@id="metadata-line"]/span[1]')
# Take the first and add it to the video dict
if len(num_views) > 0:
num_views = num_views[0]
video["num_views"] = num_views.text
videos.append(video)
# Build a DataFrame from the videos list
df = pd.DataFrame(videos, columns=["title", "num_views", "href"])
# Return the DataFrame
return df
We’ve now got a complete Python function that will search for videos on YouTube and return us a DataFrame of details about those results!
Step 2 – Calling our Python function from Excel
My end goal was to get the data collected in step 1 into Excel and use it as part of an interactive worksheet that I can use with different queries.
To call the Python function from inside of Excel and use it interactively we will use the Python Excel add-in PyXLL. Unlike other Python in Excel tools, the PyXLL add-in lets me use my own local Python environment with Selenium installed, and it can access data from the web (which is critical for this particular application!).
Installing the PyXLL add-in is straightforward, and there are resources to help you online if you get stuck. If you already have Python installed, all that is needed is to install the PyXLL add-in and then configure it to load the Python code.
Installing the PyXLL add-in
You can find instructions on how to install the PyXLL add-in online in the First Time Users page of the documentation. First the PyXLL python package is installed using “pip”
pip install pyxll
That installs the PyXLL Python package, and part of that package is a “pyxll” command line tool which can be used to install the PyXLL Excel add-in by running “pyxll install” (you can also use “python -m pyxll install” if the “pyxll” command is not found).
pyxll install
The installer leads you through the installation asking a number of questions. When asked if you have already downloaded the PyXLL add-in, answer “n” and it will download the necessary files for you.
Once the installer has finished, open Excel and the PyXLL add-in should be installed along with some examples.
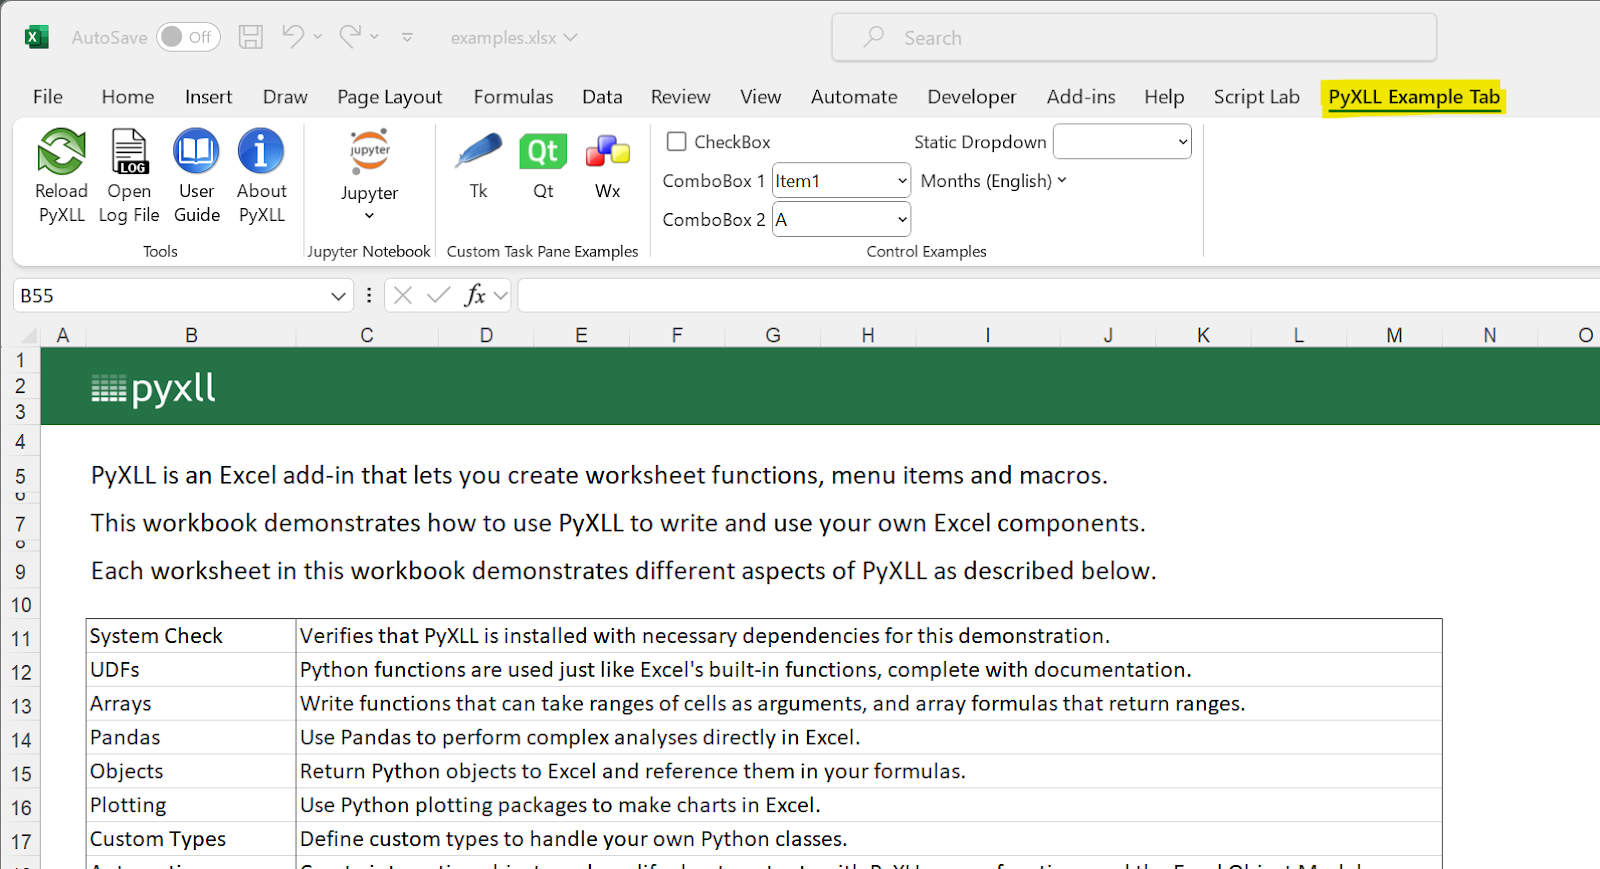
There is an example workbook and Python code included with the install. I would recommend starting by looking through that example workbook to see some of the functionality of the PyXLL add-in.
Adding our “youtube_stats” Python function to Excel
To make the “youtube_stats” function accessible from outside the Jupyter notebook, follow these steps:
- Create a new Python module named “youtube_stats.py” using your preferred Python IDE or a text editor like Notepad.
- Copy the previously developed code for the “youtube_stats” function into this module.
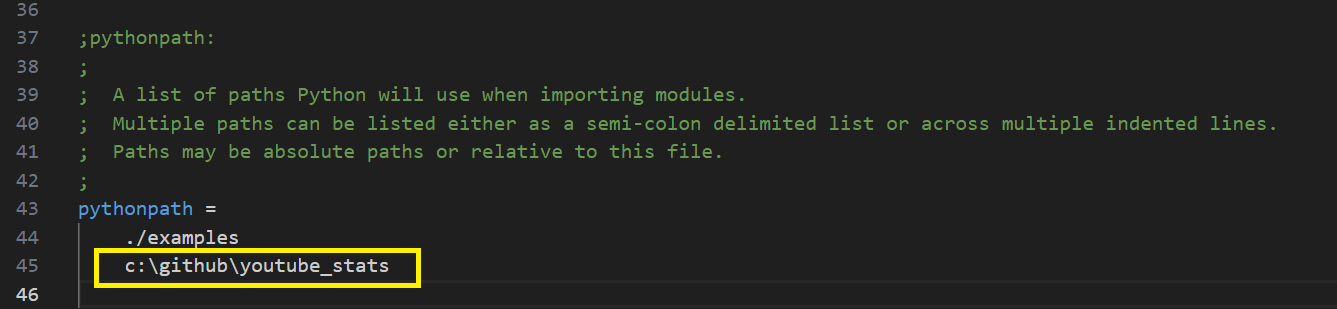
- Choose a location for the file; for example, if using GitHub, create a new folder (e.g., C:\github\youtube_stats) and save the file there.
This ensures that the “youtube_stats” function is organized in a Python module and can be imported and utilized beyond the confines of the Jupyter notebook.

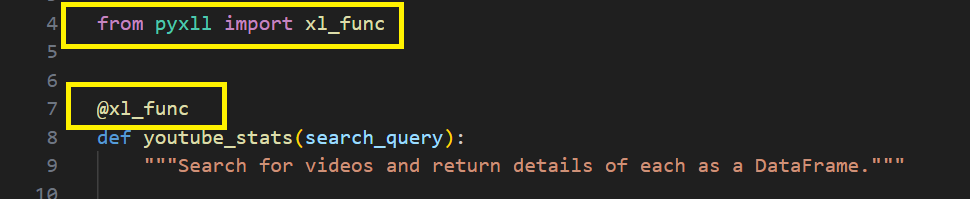
There’s just a couple of changes we need to make to our code to tell the PyXLL add-in how the “youtube_stats” function should be callable from Excel. We have to add the “@xl_func” decorator to the function, and that’s imported from the “pyxll” Python package.
For PyXLL to seamlessly handle the conversion between Excel arguments and Python types, as well as convert the Python result back to Excel values, some additional information needs to be added to the function. While not always strictly necessary due to PyXLL’s default conversions for most types, it is good practice to provide explicit instructions. One effective approach for specifying the type conversion is through the use of Python type hints.
Finally, we have to tell the PyXLL add-in to import our Python module. That’s done in the PyXLL configuration file, “pyxll.cfg”. This will be in the same folder where you installed PyXLL. If you don’t remember where that is you can run “pyxll status”, or check the “About” option in the PyXLL tab in Excel. The pyxll.cfg file is another text file and you can open it using your Python IDE or any text editor.
Tip: You can also run “pyxll config” to quickly open the pyxll.cfg file!
In the pyxll.cfg file look for the “pythonpath” setting in the “[PYTHON]” section. This is a list of folders that Python will look in when importing modules. Add the folder where you created your Python module to this list.
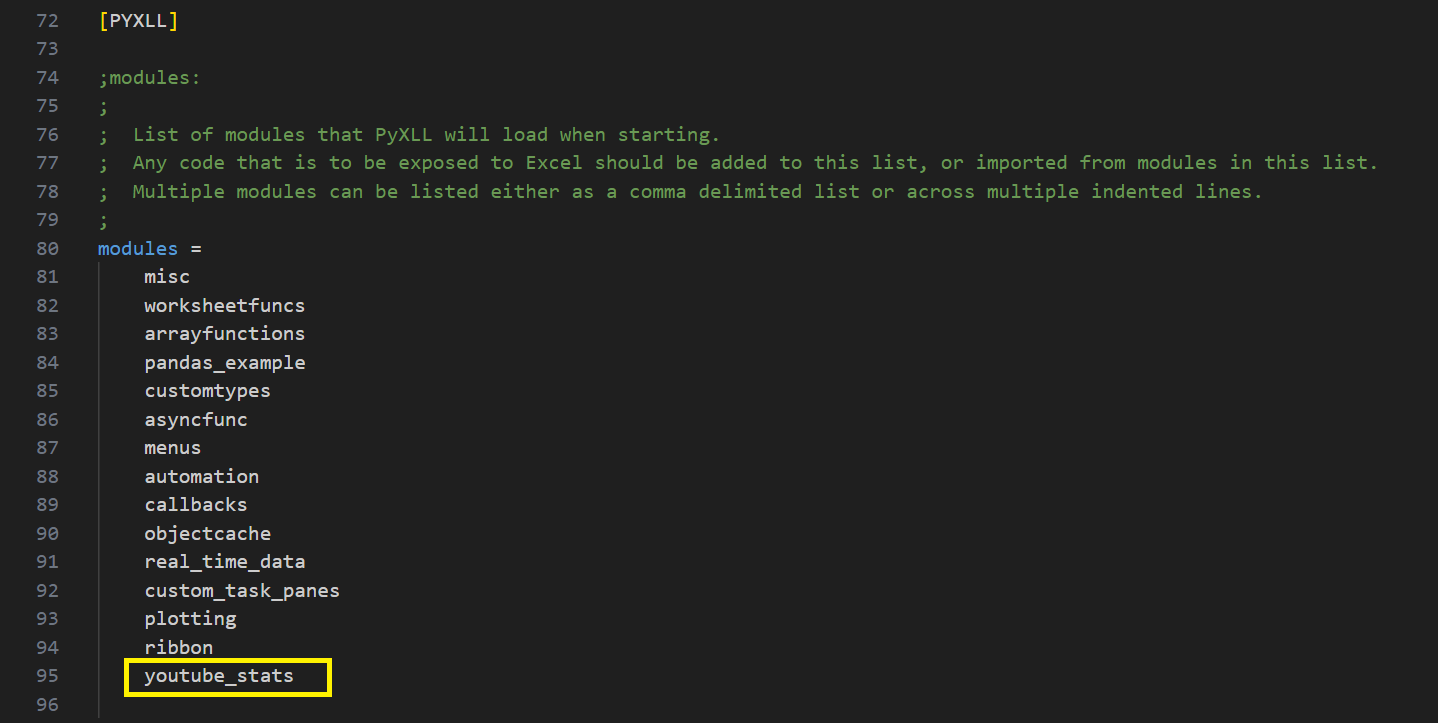
Next, look for the “modules” setting in the “[PYXLL]” section. This is a list of modules that the PyXLL add-in will import when it loads. Add the “youtube_stats” module that you just created to this list. Here we don’t use the “.py” file extension, just the module name.
Now all that’s left to do is to start Excel and check our new function is working! If you already have Excel started there’s no need to restart it. Simply click the “Reload” button in the PyXLL tab. That will reload the Python modules listed above, including our new one.
Calling our “youtube_stats” Python function in Excel
If everything has worked correctly, you can now enter the “youtube_stats” function directly into the Excel formula bar, just like any other Excel function!
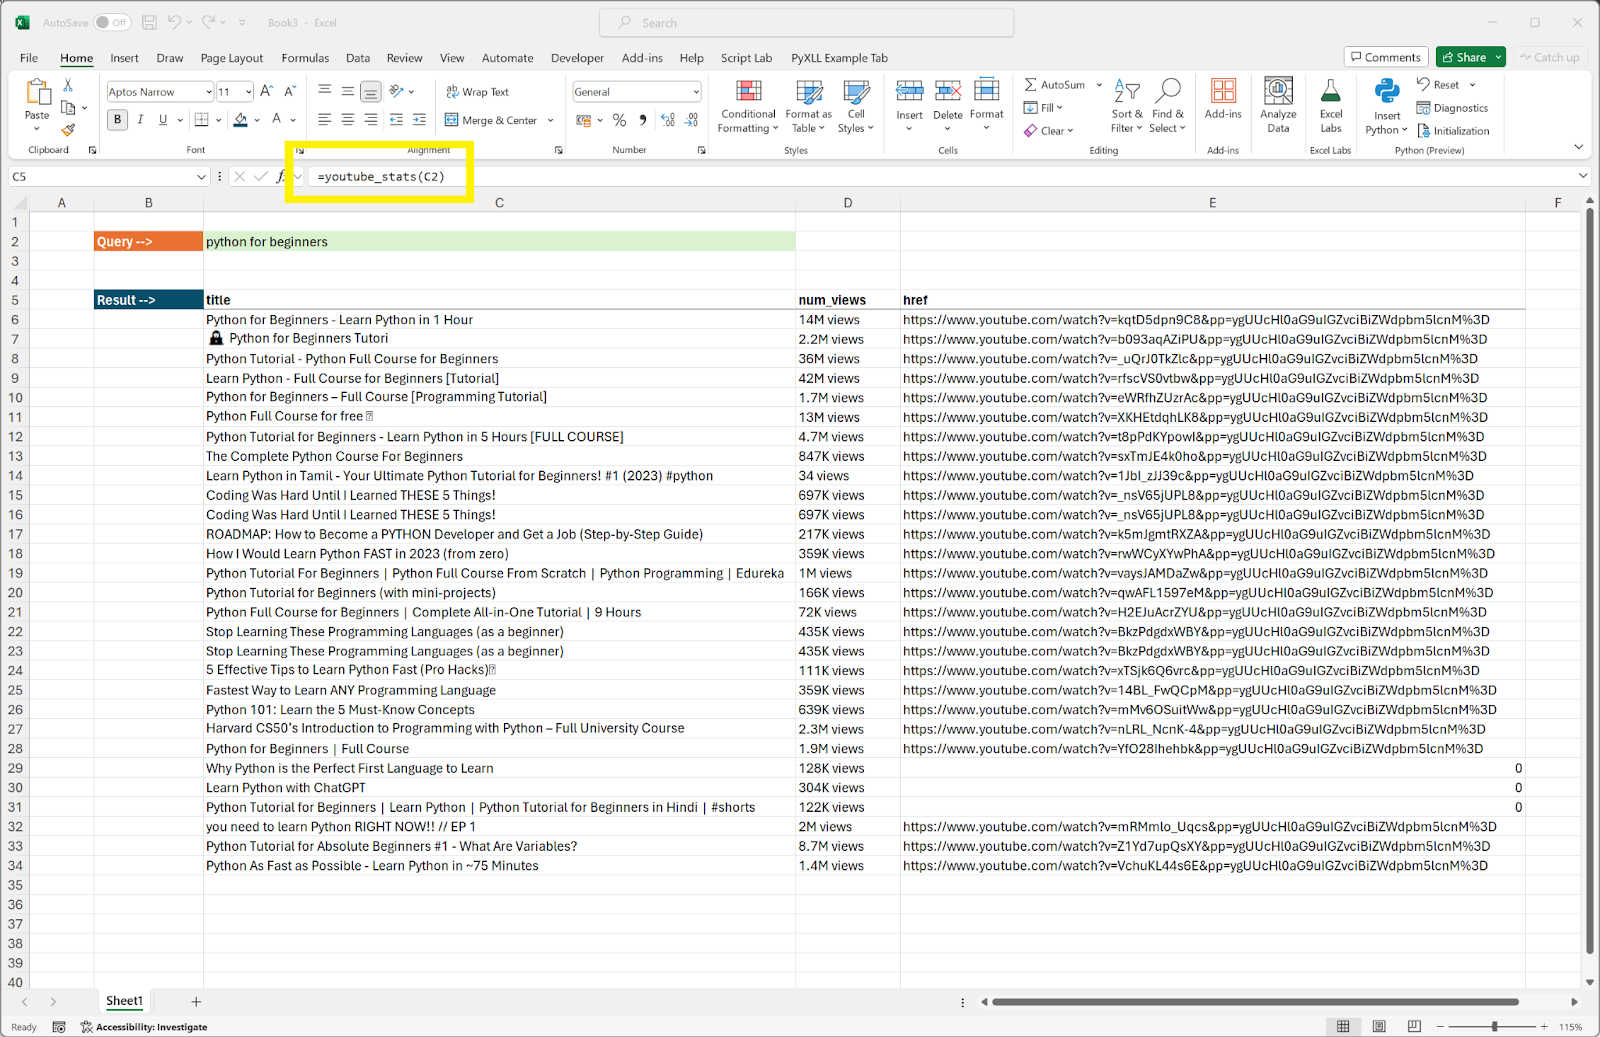
Our Python function seamlessly integrates into Excel as a standard Excel function, with the ability to pass the query string as a parameter. Whenever the input query string changes, the Python function is automatically invoked, updating the result dynamically.
The integration of the “youtube_stats” function into Excel provides substantial power, enabling interactive and productive manipulation and analysis of extracted data. Leveraging this, I’ve developed additional tools for swift research on topic ideas for new videos, streamlining the process and enhancing productivity.
What’s truly remarkable is that individuals unfamiliar with Python can effortlessly use these functions in Excel, without any learning curve. As Python code evolves to introduce new functions or enhance existing ones, it can be shared independently of the workbook. Unlike VBA, the Python code exists outside of Excel, residing in a designated folder on the local PC or a shared network drive. This independence facilitates efficient management and version control, separate from the workbooks utilizing these functions.
Wrapping Up
This article demonstrated the capability to scrape data from intricate websites like YouTube, leveraging the Selenium Python package designed for handling JavaScript-intensive sites. For simpler sites utilizing static HTML, BeautifulSoup, another Python package for web scraping, is a slightly simpler alternative, although it lacks support for client-side rendering.
Additionally, we explored how intricate Python functions can seamlessly integrate with Excel through the PyXLL Python Excel add-in. Unlike other tools such as xlsxwriter, openpyxl, and pandas, which are limited to generating static reports, PyXLL empowers the creation of Python function toolkits for interactive use within Excel. This functionality proves valuable for Excel users with minimal or no Python knowledge.
For further details on PyXLL, visit the website https://www.pyxll.com. While PyXLL is a commercial (paid) product, a 30-day free trial is available, allowing users to explore its numerous features before making a purchase.