If you’re using Enthought Canopy you can download PyXLL from the Canopy Package Manager. For all other Python users simply download PyXLL from the Download Page instead, where it says “Download PyXLL for Standalone Installation”.
Once you’ve downloaded PyXLL, the rest of this post will get you up and running.
When you download PyXLL, pay attention to what version of Python you are downloading for and whether you want the 32 bit or 64 bit version. If you are using a 32 bit version of Excel you must download the 32 bit PyXLL package and you will also need to use a 32 bit version of Python (PyXLL embeds Python into Excel, and so the processor version must be the same).
Once you’ve done that, follow the following steps to install PyXLL:
1. Unpack the zipfile
Canopy users can skip this step
PyXLL can be used with any Python distribution. Depending on how you have Python installed on your system you may need to configure PyXLL so it knows where to find your Python installation.
PyXLL is packaged as a zip file. Simply unpack the zip file where you want PyXLL to be installed, there is no installer to run.
2. Edit the config file
Once you’ve unzipped the PyXLL download is to edit the file pyxll.cfg in any text editor. The default configuration may be fine for you while you’re getting started, and you can come back to it later if you want to make any changes.
Canopy users launch Canopy and type “edit_pyxll_configuration” to open the config file.
If your Python installation is not configured to be the default Python installation (this is common with Anaconda and PortablePython distributions) you will need set the following in your config file
[PYTHON]
executable = <your python.exe file here>
If you get an error saying that Python is not installed or the Python dll can’t be found you may need to set the Python executable in the config.
If setting the executable doesn’t resolve the problem then it’s possible your Python dll is in a non-standard location. You can also set the dll location in the config to tell PyXLL where to find it.
[PYTHON]
executable = <your python.exe file here>
dll = <your pythonXX.dll file here - usually not needed>
3. Install the addin
Once you’re happy with the configuration you can install the addin in Excel by following the instructions
below.
- Excel 2010 – 2016
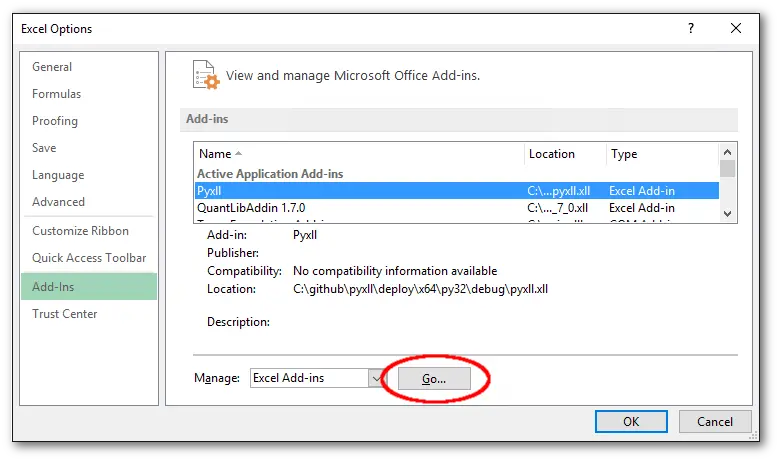
Select the File menu in Excel and go to Options -> Add-Ins -> Manage Excel Addins and browse for the folder you unpacked PyXLL to and select pyxll.xll. - Excel 2007
Click the large circle at the top left of Excel and go to Options -> Add-Ins -> Manage Excel Addins and browse for the folder you unpacked PyXLL to and select pyxll.xll. - Excel 97 – 2003
Go to Tools -> Add-Ins -> Browse and locate pyxll.xll in the folder you unpacked the zip file to.
4. Optional Install the PyXLL stubs package
If you are using a Python IDE that provides autocompletion or code checking, because the pyxll module isn’t installed, you may find it complains and won’t be able to provide any autocompletion
for functions imported from the pyxll module.
In the downloaded zip file you will find a .whl file. The exact filename varies depending on the version of PyXLL you’ve downloaded. That’s a Python Wheel containing a dummy pyxll module that you can use for the purposes of keeping your IDE from complaining, and for writing code that
depends on the pyxll module that you want to use outside of Excel (e.g. when unit testing).
To install the wheel run the following command (substituting the actual wheel filename) from a command line::
> pip install {pyxll wheel filename}
The real pyxll module is compiled into the pyxll.xll addin.
If you are using a version of Python that isn’t supported by pip all you need to do is to unzip the wheel file into your Python site-packages folder (the wheel file is simply a zip file with a different file extension).
Calling a Python Function in Excel
One of the main features of PyXLL is being able to call a Python function from a formula in an Excel workbook.
For this tutorial we’ll use a simple recursive form of the well known fibonacci function.
def fibonacci(n):
    assert n >= 0, "n must be >= 0"
    if n == 0:
        return 0
    if n == 1:
        return 1
    return fibonacci(n-1) + fibonacci(n-2)
Save that to a file called fibonacci.py and try calling it from a Python prompt to check it works correctly.
In [1]: from fibonacci import fibonacci
In [2]: fibonacci(5)
Out[2]: 5
In [3]: fibonacci(10)
Out[3]: 55
To expose this function to Excel using PyXLL, all that’s needed is to apply the xl_func decorator.
from pyxll import xl_func

@xl_func
def fibonacci(n):
    assert n >= 0, "n must be >= 0"
    if n == 0:
        return 0
    if n == 1:
        return 1
    return fibonacci(n-1) + fibonacci(n-2)
Now add the fibonacci module to the PyXLL config:
[PYXLL]
modules = fibonacci

[PYTHON]
pythonpath = <path where you saved fibonacci.py>
Reload PyXLL by going to the Addins menu in Excel and selecting PyXLL -> Reload.
Now in a worksheet you can type a formula using your new Python function.
=fibonacci(10)
If you make any mistakes in your code or your function returns an error you can check the log file to find out what the error was, make and necessary changes to your code and reload PyXLL again.
This function is not by any means an optimal solution to the fibonacci problem, and in fact it’s so slow that you may find that if you try and calculate it for anything other than a very small number it takes a long time! In Excel, you can abort a calculation by pressing the Esc (escape) key . PyXLL will raise a KeyboardInterupt exception which will stop the Python function early, but only if allow_abort is enabled. This can be done on a function by function basis by passing allow_abort to xl_func, or globally by setting it in the config file:
[PYXLL]
allow_abort = 1
Next Steps
The User Guide has comprehensive coverage of how to use all the features of PyXLL and a quick look through there will quickly bring you up to speed on how to do most things with PyXLL.
Many of PyXLL’s features are demonstrated in the examples included in download. These are a good place to start to learn more about what PyXLL can do.
More example code can be found on PyXLL’s GitHub page https://github.com/pyxll.
If there is anything specifically you’re trying to achieve and can’t find an example or help in the user guide please contact us and we will do our best to help.