
PySide and PyQt are both Python packages wrapping the popular Qt UI toolkit. They are quite similar but have different licenses and so which one you choose will be down to your own preference. Both work equally well with PyXLL.
User interfaces developed using Qt can be embedded as ActiveX controls directly on the Excel worksheet. If instead you want your controls to appear in a docked or floating window, see Custom Task Panes.
This document is not a guide to use PySide or PyQt. It is only intended to instruct you on how to use PySide and PyQt with the ActiveX feature of PyXLL. You should refer to the relevant package documentation for details of how to use each package.
Both PySide and PyQt can be installed using pip or conda, for example:
> pip install pyside6
# or
> pip install pyqt6
# or
> conda install pyside6
# or
> conda install "pyqt>=6"
Typically you will only want to install one or the other, and you should install it using pip or conda and not both.
You can find more information about PySide and PyQt on the websites, https://wiki.qt.io/Qt_for_Python and https://www.riverbankcomputing.com/software/pyqt/ respectively.
Any of PySide2, PySide6, PyQt5 and PyQt6 can be used with PyXLL.
One of the main classes in Qt is the QWidget class. To create your own user interface it
is this QWidget class that you will use, and it’s what PyXLL will embed into Excel as
an ActiveX control.
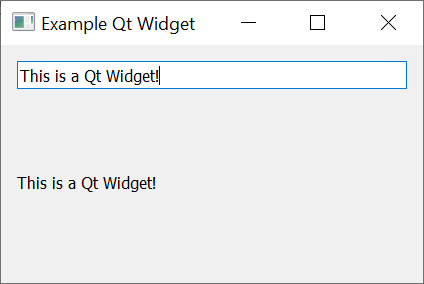
The following code demonstrates how to create simple Qt widget. If you run this code as a Python script then you will see the widget being shown.
from PySide6 import QtWidgets
# or from PyQt6 import QtWidgets
import sys

class ExampleWidget(QtWidgets.QWidget):

    def __init__(self):
        super().__init__()
        self.initUI()

    def initUI(self):
        """Initialize the layout and child controls for this widget."""
        # Create a "Layout" object to help layout the child controls.
        # A QVBoxLayout lays out controls vertically.
        vbox = QtWidgets.QVBoxLayout(self)

        # Create a QLineEdit control and add it to the layout
        self.line_edit = QtWidgets.QLineEdit(self)
        vbox.addWidget(self.line_edit)

        # Create a QLabel control and add it to the layout
        self.label = QtWidgets.QLabel(self)
        vbox.addWidget(self.label)

        # Connect the 'textChanged' event to our 'onChanged' method
        self.line_edit.textChanged.connect(self.onChanged)

        # Set the layout for this widget
        self.setLayout(vbox)

    def onChanged(self, text):
        """Called when the QLineEdit's text is changed"""
        # Set the text from the QLineEdit control onto the label control
        self.label.setText(text)
        self.label.adjustSize()

if __name__ == "__main__":
    # Create the Qt Application
    app = QtWidgets.QApplication(sys.argv)

    # Create our example widget and show it
    widget = ExampleWidget()
    widget.show()

    # Run the Qt app
    sys.exit(app.exec_())
When you run this code you will see our example widget being display, and as you enter text into the line edit control the label below will be updated.
Next we’ll see how we can use this widget in Excel.
To show a QWidget in Excel as an ActiveX control we use the
create_activex_control function.
As above, before we can create the widget we have to make sure the QApplication has been initialized. Unlike the above script, our function may be called many times and so we don’t want to create a new application each time and so we check to see if one already exists.
The QApplication object must still exist when we call create_activex_control.
If it has gone out of scope and been released then it will cause problems later so always
make sure to keep a reference to it.
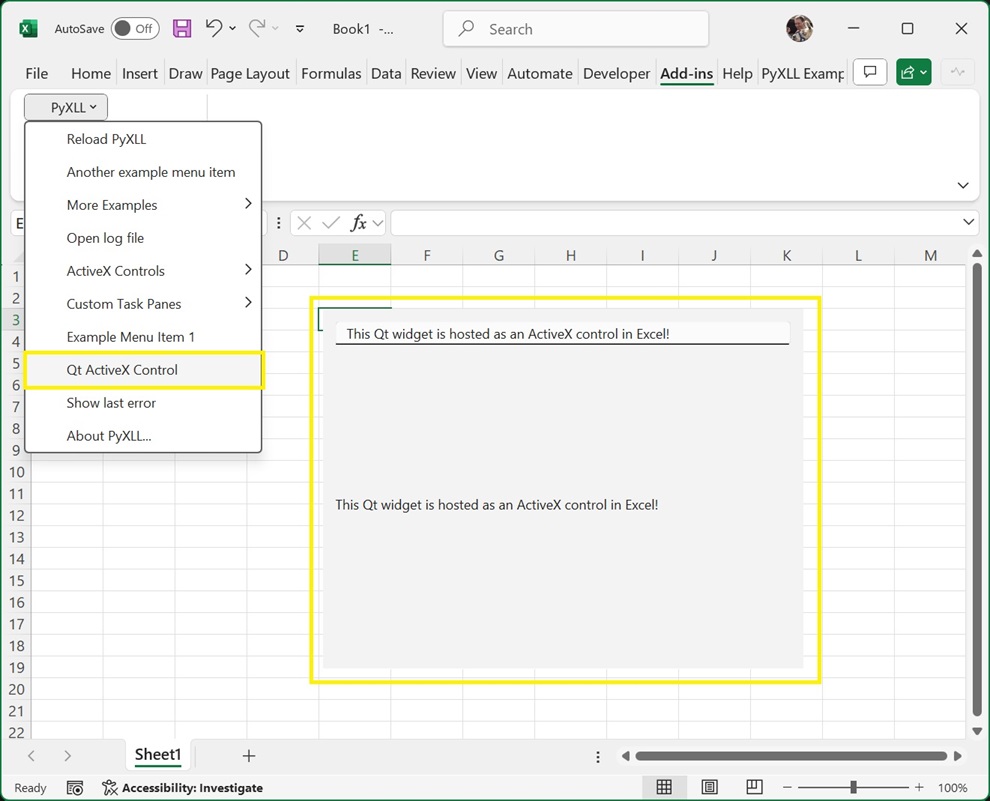
We can create the ActiveX control from many different places, but usually it will be from a ribbon function, or a menu function, or a worksheet function
The following code shows how we would create an ActiveX control from an Excel menu
function, using the ExampleWidget control from the example above.
from pyxll import xl_menu, create_activex_control
from PySide6 import QtWidgets
# or from PyQt6 import QtWidgets

@xl_menu("Qt ActiveX Control")
def qt_activex_control():
    # Before we can create a Qt widget the Qt App must have been initialized.
    # Make sure we keep a reference to this until create_activex_control is called.
    app = QtWidgets.QApplication.instance()
    if app is None:
        app = QtWidgets.QApplication([])

    # Create our example Qt widget from the code above
    widget = ExampleWidget()

    # Use PyXLL's 'create_activex_control' function to create the ActiveX control.
    create_activex_control(widget)
When we add this code to PyXLL and reload the new menu function “Qt ActiveX Control” will be available, and when that menu function is run the ExampleWidget is created as an ActiveX control directly in the current Excel worksheet.
The optional parameters to create_activex_control can be used to set the size, position, and
what sheet the control is created on.
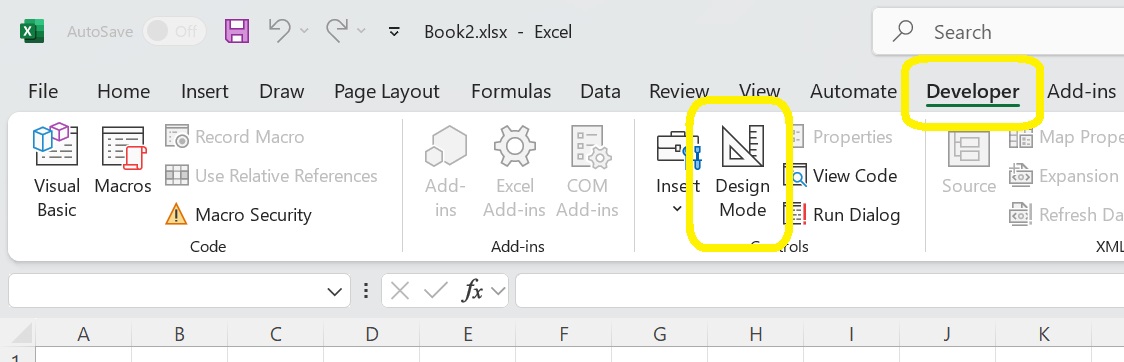
To move or resize the ActiveX control you first need to enable Design Mode.
To enable Design Mode, go to the Developer tab in the Excel ribbon and select Design Mode.
Whilst in Design Mode a bitmap preview will be displayed instead of the web control. You can now move
and resize this shape. There may be some lag between resizing the preview image and the preview image
updating.
To return to the interactive web widget, unselect Design Mode.
See the API reference for create_activex_control for more details.