
tkinter is a Python packages that wraps the Tk GUI toolkit.
tkinter is included with Python and so is available to use without needing to install any additional packages.
User interfaces developed using Qt can be embedded as ActiveX controls directly on the Excel worksheet. If instead you want your controls to appear in a docked or floating window, see Custom Task Panes.
This document is not a guide to use tkinter. It is only intended to instruct you on how to use Tkinter with the Custom Task Pane feature of PyXLL. You should refer to the tkinter documentation for details of how to use tkinter.
You can find more information about tkinter in the Python docs website https://docs.python.org/3/library/tkinter.html.
One of the main classes in tkinter is the Frame class. To create your own user interface it
is this Frame class that you will use, and it’s what PyXLL will embed into Excel as
a Custom Task Pane.
The following code demonstrates how to create simple tkinter.Frame. If you run this
code as a Python script then you will see the frame being shown.
import tkinter as tk

class ExampleFrame(tk.Frame):

    def __init__(self, master):
        super().__init__(master)
        self.initUI()

    def initUI(self):
        # allow the widget to take the full space of the root window
        self.pack(fill=tk.BOTH, expand=True)

        # Create a tk.Entry control and place it using the 'grid' method
        self.entry_value = tk.StringVar()
        self.entry = tk.Entry(self, textvar=self.entry_value)
        self.entry.grid(column=0, row=0, padx=10, pady=10, sticky="ew")

        # Create a tk.Label control and place it using the 'grid' method
        self.label_value = tk.StringVar()
        self.label = tk.Label(self, textvar=self.label_value)
        self.label.grid(column=0, row=1, padx=10, pady=10, sticky="w")

        # Bind write events on the 'entry_value' to our 'onWrite' method
        self.entry_value.trace("w", self.onWrite)

        # Allow the first column in the grid to stretch horizontally
        self.columnconfigure(0, weight=1)

    def onWrite(self, *args):
        """Called when the tk.Entry's text is changed"""
        # Update the label's value to be the same as the entry value
        self.label_value.set(self.entry_value.get())

if __name__ == "__main__":
    # Create the root Tk object
    root = tk.Tk()

    # Give the root window a title
    root.title("Tk Example")

    # Construct our frame object
    ExampleFrame(master=root)

    # Run the tk main loop
    root.mainloop()
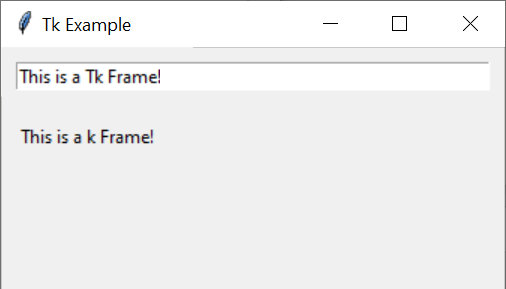
When you run this code you will see our example frame being display, and as you enter text into the text entry control the static text label below will be updated.
Next we’ll see how we can use this frame in Excel.
To show a tkinter.Frame in Excel using PyXLL we use the create_activex_control function.
As above, before we can create the frame we have to create a root object to add it to. Unlike
the above script, our function may be called many times and so we don’t want to use the tk.Tk
root object. Instead we use a tk.Toplevel object.
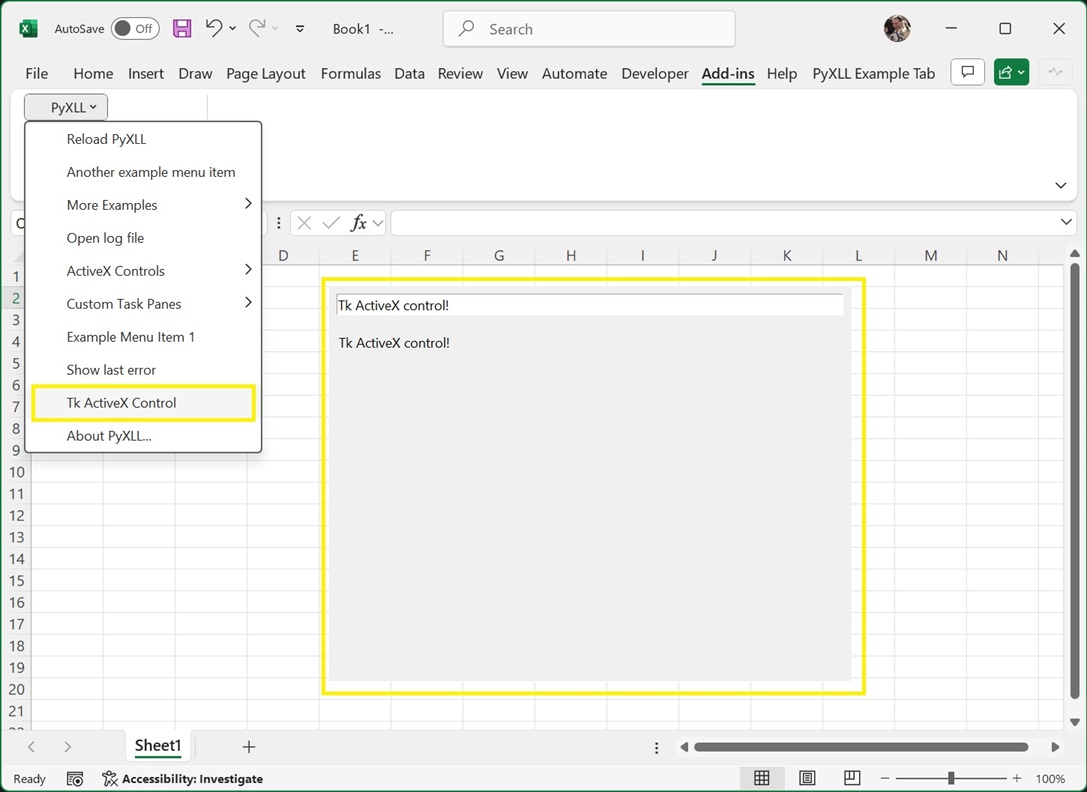
We can create the ActiveX control from many different places, but usually it will be from a ribbon function, or a menu function, or a worksheet function
The following code shows how we would create an ActiveX control from an Excel menu
function, using the ExampleFrame control from the example above.
from pyxll import xl_menu, create_activex_control
import tkinter as tk

@xl_menu("Tk ActiveX Control")
def tk_activex_control():
    # Create the top level Tk window
    window = tk.Toplevel()

    # Create our example frame from the code above and add
    # it to the top level window.
    frame = ExampleFrame(master=window)

    # Use PyXLL's 'create_activex_control' function to create the ActiveX control.
    create_activex_control(window, width=400, height=400)
When we add this code to PyXLL and reload the new menu function “Tk ActiveX Control” will be available, and when that menu function is run the ExampleFrame is opened as an ActiveX control in Excel.
The optional parameters to create_activex_control can be used to set the size, position, and
what sheet the control is created on.
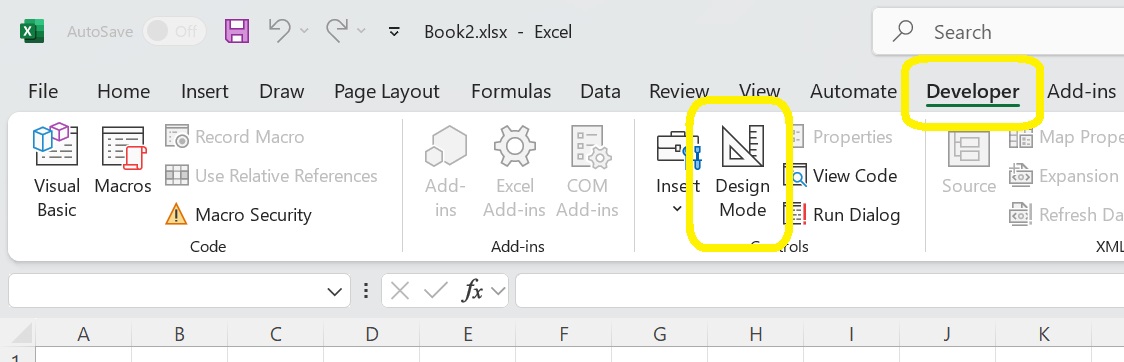
To move or resize the ActiveX control you first need to enable Design Mode.
To enable Design Mode, go to the Developer tab in the Excel ribbon and select Design Mode.
Whilst in Design Mode a bitmap preview will be displayed instead of the web control. You can now move
and resize this shape. There may be some lag between resizing the preview image and the preview image
updating.
To return to the interactive web widget, unselect Design Mode.
See the API reference for create_activex_control for more details.