

Before you start you will need to have Microsoft Excel for Windows installed, as well as a compatible version of Python.
PyXLL works with any Python distribution, including Anaconda. For specific instructions about installing with Anaconda or Miniconda see Using PyXLL with Anaconda.
These instructions are for manually installing the PyXLL Excel Add-In.
You may find it more convenient to use our command line tool for installing or upgrading PyXLL.
PyXLL comes as a zipfile you download from the download page. Select and download the correct version depending on the versions of Python and Excel you want to use and agree to the terms and conditions.
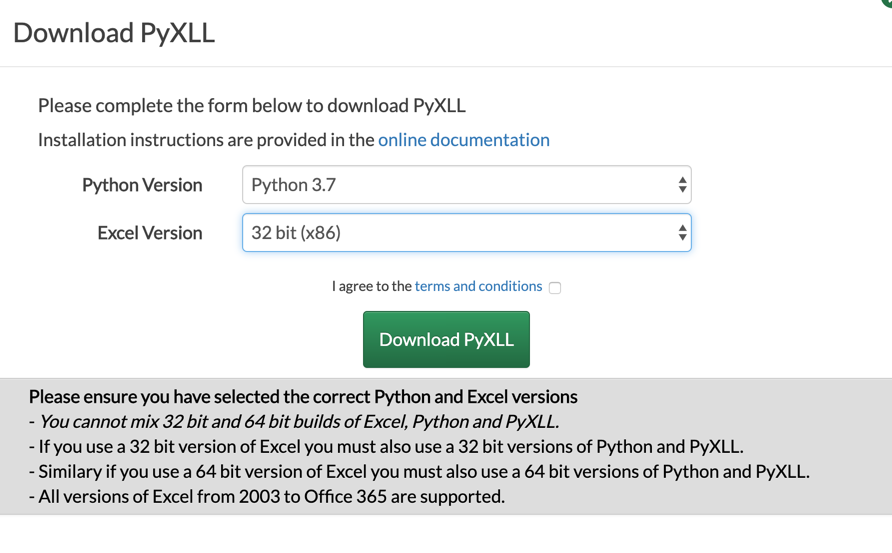
Excel, Python and PyXLL all come in 64-bit and 32-bit versions.
The three products must be all 32-bit or all 64-bit.
See Do I have 32 bit of 64 bit Excel? to determine which version of Excel you are using.
Check whether you have 32-bit or 64-bit Python installed using the command:
python -c "import sys; print(sys.version)"
PyXLL is packaged as a zip file. Unpack the zip file where you want PyXLL to be installed.
There is no installer to run; you complete the installation in Excel after any necessary configuration changes.
You configure PyXLL by editing the pyxll.cfg file. Any text editor will do.
Set the executable setting in the PYTHON section of your config file to the full path to your Python executable.
[PYTHON]
executable = <path to your pythonw.exe>
PyXLL uses this setting to determine where the Python runtime libraries and Python packages are located.
You can determine where the executable for an installed Python interpreter with the command:
pythonw -c "import sys; print(sys.executable)"
While you have the pyxll.cfg file open take look through and see what other options are available.
You can find documentation for all available options in the Configuring PyXLL section of the user guide.
One important section of the config file is the LOG section. In there you can set where PyXLL should log to and the logging level. If you are having trouble, set the log verbosity to debug to get more detailed logging.
[LOG]
verbosity = debug
The “;” character is used to comment out lines in the config file.
If a line starts with “;” then it will not be read by PyXLL.
Once you’re happy with the configuration you can install the add-in in Excel by following the instructions below.
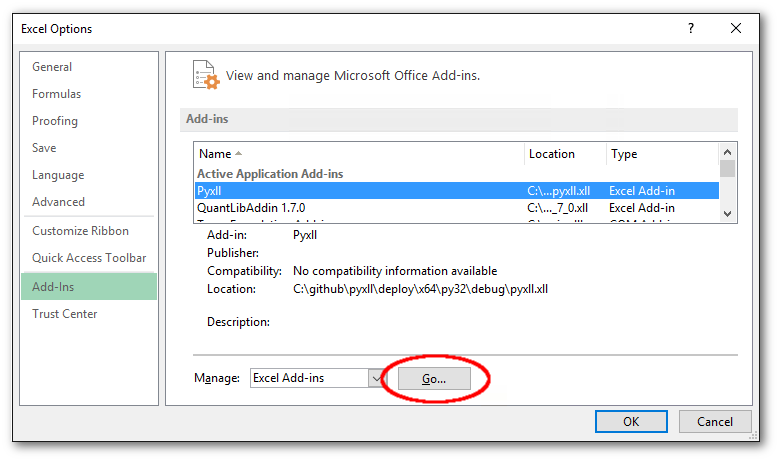
Select the File menu in Excel and go to Options -> Add-Ins -> Manage Excel Addins and browse for the folder you unpacked PyXLL to and select pyxll.xll.
Click the large circle at the top left of Excel and go to Options -> Add-Ins -> Manage Excel Addins and browse for the folder you unpacked PyXLL to and select pyxll.xll.
Go to Tools -> Add-Ins -> Browse and locate pyxll.xll in the folder you unpacked the zip file to.
If Excel prompts you to ask if you want to copy the add-in to your local add-ins folder then select No.
When PyXLL loads it expects its config file to be in the same folder as the add-in, and if Excel copies it to your local add-ins folder then it won’t be able to find its config file.
If you are using a Python IDE that provides autocompletion or code checking or if you want to
execute your code outside Excel, say for testing purposes, you will need to install the pyxll module
to avoid your code raising ImportError exceptions.
In the downloaded zip file you will find a .whl file whose exact filename depends on the version of PyXLL. That’s a Python Wheel containing a dummy pyxll module that you can import when testing without PyXLL. You can then use code that depends on the pyxll module outside of Excel (e.g. when unit testing).
To install the wheel run the following command (substituting the actual wheel filename) from a command line:
> cd C:\Path\Where\You\Unpacked\PyXLL
> pip install "pyxll-wheel-filename.whl"
The real pyxll module is compiled into the pyxll.xll addin, and so is always available when your code is running inside Excel.
If you are using a version of Python that doesn’t support pip you can instead unzip the .whl file into your Python site-packages folder (the wheel file is simply a zip file with a different file extension).
Now you have PyXLL installed you can start adding your own Python code to Excel.
See Worksheet Functions for details of how you can expose your own Python functions to Excel as worksheet functions, or browse the User Guide for information about the other features of PyXLL.